AstroPaper 博客自定义

Caution
因本站已对博客主题完成重构,此博客内容已过时,仅存档。
修改博客主题现有内容
修改主题颜色
根据个人喜好对主题的深色模式中的颜色定义进行了修改,修改 --color-fill 以更改网站的背景颜色,修改 --color-accent 以更改强调色。相关 CSS 定义于 src/styles/base.css 中:
diff --git a/src/styles/base.css b/src/styles/base.cssindex 6efa219..7b4de7a 100644--- a/src/styles/base.css+++ b/src/styles/base.css@@ -13,9 +13,9 @@ --color-border: 236, 233, 233; } html[data-theme="dark"] {- --color-fill: 33, 39, 55;+ --color-fill: 27, 32, 37; --color-text-base: 234, 237, 243;- --color-accent: 255, 107, 1;+ --color-accent: 217, 122, 72; --color-card: 52, 63, 96; --color-card-muted: 138, 51, 2; --color-border: 171, 75, 8;修改代码高亮
AstroPaper 通过 Shiki 实现代码高亮,支持多种主题,可以在 astro.config.ts 中进行配置。我选择采用 catppuccino-mocha 主题替换默认的 one-dark-pro 主题。
diff --git a/astro.config.ts b/astro.config.tsindex 52d3437..cc33c96 100644--- a/astro.config.ts+++ b/astro.config.ts@@ -25,14 +25,28 @@ export default defineConfig({ rehypePlugins: [rehypeKatex], shikiConfig: {- theme: "one-dark-pro",+ // https://shiki.style/themes+ theme: "catppuccin-mocha",+ // 另外,也提供了多种主题+ // https://shiki.style/guide/dual-themes+ // themes: {+ // light: 'github-light',+ // dark: 'min-dark',+ // },+ // 添加自定义语言+ // https://shiki.style/languages+ // langs: [],+ // 启用自动换行,以防止水平滚动 wrap: true,+ // 添加自定义转换器:https://shiki.style/guide/transformers+ // 查找常用转换器:https://shiki.style/packages/transformers+ // transformers: [], }, }, vite: {修改字体
由于 AstroPaper 主题默认采用的 IBM Plex Mono 字体对于中文支持不佳,我选择将主字体替换为个人更偏好的 Sono,而对于 Sono 字体无法渲染的中文等部分,则由开源中文字体 霞鹜文楷 提供,最后以 monospace 作为 fallback 字体。
在 tailwind.config.cjs 中将 IBM Plex Mono 替换为 Sono 和 LXGW WenKai Screen:
diff --git a/tailwind.config.cjs b/tailwind.config.cjsindex 8e43860..06dacbc 100644--- a/tailwind.config.cjs+++ b/tailwind.config.cjs@@ -55,6 +55,7 @@ module.exports = { }, fontFamily: {- mono: ["IBM Plex Mono", "monospace"],+ mono: ["Sono", "LXGW WenKai Screen", "monospace"], }, typography: {接下来需要引入霞鹜文楷字体的 Stylesheet,为了避免阻塞渲染,可以将 media 设置为 print,在加载完成后再将 media 设置为 all。同时,采用饿了么提供的 CDN 提高加载速度,相关代码添加到 src/layouts/Layout.astro 中:
diff --git a/src/layouts/Layout.astro b/src/layouts/Layout.astroindex 826c3d2..931baa1 100644--- a/src/layouts/Layout.astro+++ b/src/layouts/Layout.astro@@ -99,6 +94,14 @@ const socialImageURL = new URL( rel="stylesheet" />
+ <!-- LXGW WenKai Font -->+ <link+ rel="stylesheet"+ href="https://npm.elemecdn.com/lxgw-wenkai-screen-webfont/style.css"+ media="print"+ onload="this.media='all'"+ />+ <meta name="theme-color" content="" />但是通过以上的修改,会存在两个问题:
- 标签展示时,若采用霞鹜文楷字体,会导致显示紊乱;
- 代码框中也会采用霞鹜文楷字体,不符合等宽字体的要求。
对于第一个问题,需要在 src/components/Tag.astro 中将字体设定为 font-mono:
diff --git a/src/components/Tag.astro b/src/components/Tag.astroindex 5a4a376..72f65e0 100644--- a/src/components/Tag.astro+++ b/src/components/Tag.astro@@ -31,6 +31,7 @@ const { tag, size = "sm" } = Astro.props; <style> a {- @apply relative underline decoration-dashed hover:-top-0.5 hover:text-skin-accent focus-visible:p-1;+ @apply relative underline decoration-dashed hover:-top-0.5 hover:text-skin-accent focus-visible:p-1 font-mono; } a svg { @apply -mr-5 h-6 w-6 scale-95 text-skin-base opacity-80 group-hover:fill-skin-accent;对于第二个问题,在 src/styles/base.css 中,将 pre > code 的字体设定为 font-mono 即可:
diff --git a/src/styles/base.css b/src/styles/base.cssindex 6efa219..7b4de7a 100644--- a/src/styles/base.css+++ b/src/styles/base.css@@ -122,6 +120,33 @@ pre:has(code) {- @apply border border-skin-line;+ @apply border border-skin-line font-mono; } }精简 Footer 中呈现的社交图标
在默认情况下,所有在 src/config.ts 中 active 字段值为 true 的社交图标都会同时在首页和 Footer 中展示,但是我希望 Footer 中只展示部分社交图标。
首先,在 src/components/ 目录下添加 Socials-footer.astro 组件,基本与 Socials.astro 相同,区别在于只展示 footeractive 为 true 的社交图标:
diff --git a/src/components/Socials-footer.astro b/src/components/Socials-footer.astronew file mode 100644index 0000000..e90cdcc--- /dev/null+++ b/src/components/Socials-footer.astro@@ -0,0 +1,35 @@+---+import { SOCIALS } from "@config";+import LinkButton from "./LinkButton.astro";+import socialIcons from "@assets/socialIcons";++export interface Props {+ centered?: boolean;+}++const { centered = false } = Astro.props;+---++<div class={`social-icons ${centered ? "flex" : ""}`}>+ {+ SOCIALS.filter(social => social.footeractive).map(social => (+ <LinkButton+ href={social.href}+ className="link-button"+ title={social.linkTitle}+ >+ <Fragment set:html={socialIcons[social.name]} />+ <span class="sr-only">{social.linkTitle}</span>+ </LinkButton>+ ))+ }+</div>++<style>+ .social-icons {+ @apply flex-wrap justify-center gap-1;+ }+ .link-button {+ @apply p-2 hover:rotate-6 sm:p-1;+ }+</style>对于 src/config.ts 中定义的 SOCIALS 常量,添加布尔值 footeractive 字段,用于控制是否在 Footer 中展示:
diff --git a/src/config.ts b/src/config.tsindex 35aae63..6e9089a 100644--- a/src/config.ts+++ b/src/config.ts@@ -17,131 +18,151 @@ export const SOCIALS: SocialObjects = [ { name: "Github", href: "https://github.com/synthpop123", linkTitle: `${SITE.author} on Github`, active: true,+ footeractive: true, }, { name: "Instagram", href: "https://www.instagram.com/whoamamiii/", linkTitle: `${SITE.author} on Instagram`, active: true,+ footeractive: false, },为了保证 footeractive 的合法性,需要在 src/types.ts 中添加对应的类型定义:
diff --git a/src/types.ts b/src/types.tsindex 72ba2f0..97ccdca 100644--- a/src/types.ts+++ b/src/types.ts@@ -15,5 +16,6 @@ export type SocialObjects = { name: keyof typeof socialIcons; href: string; active: boolean;+ footeractive: boolean; linkTitle: string; }[];添加 Misc 页面
在博客中添加一个 Misc 页面,用于展示一些额外的内容,如友链、听歌观影记录等。首先在 src/layouts 目录下添加 MiscLayout.astro:
diff --git a/src/layouts/MiscLayout.astro b/src/layouts/MiscLayout.astronew file mode 100644index 0000000..dc7d48f--- /dev/null+++ b/src/layouts/MiscLayout.astro@@ -0,0 +1,58 @@+---+import { SITE } from "@config";+import Breadcrumbs from "@components/Breadcrumbs.astro";+import Footer from "@components/Footer.astro";+import Header from "@components/Header.astro";+import Layout from "./Layout.astro";++export interface Props {+ frontmatter: {+ title: string;+ description?: string;+ };+}++const { frontmatter } = Astro.props;+---++<Layout title={`${frontmatter.title} | ${SITE.title}`}>+ <Header activeNav="misc" />+ <Breadcrumbs />+ <main id="main-content">+ <section id="misc" class="prose prose-img:border-0 mb-28 max-w-3xl">+ <h1 class="text-2xl tracking-wider sm:text-3xl">{frontmatter.title}</h1>+ <slot />+ </section>+ </main>+</Layout>+<Footer />接下来需要修改 Header.astro ,使 Misc 页面可以正常显示在导航栏中:
diff --git a/src/components/Header.astro b/src/components/Header.astroindex 43a4a71..54264c7 100644--- a/src/components/Header.astro+++ b/src/components/Header.astro@@ -4,7 +4,7 @@ import Hr from "./Hr.astro"; import LinkButton from "./LinkButton.astro";
export interface Props {- activeNav?: "posts" | "tags" | "about" | "search";+ activeNav?: "posts" | "tags" | "misc" | "about" | "search"; }
const { activeNav } = Astro.props;@@ -65,6 +65,11 @@ const { activeNav } = Astro.props; Tags </a> </li>+ <li>+ <a href="/misc/" class={activeNav === "misc" ? "active" : ""}>+ Misc+ </a>+ </li> <li> <a href="/about/" class={activeNav === "about" ? "active" : ""}>自定义添加新功能
添加 KaTeX 支持
详见此前的博客文章 为 AstroPaper 主题添加 KaTeX 支持。
Last.fm 最近听歌记录展示
自 2021 年起,我开始采用 Last.fm 记录自己所听的音乐。为了能将其展示在博客中,我借助开源项目 lastfm-recently-played-readme,生成最近听歌记录的图片,可以便携地嵌入到博客 Markdown 文件中。
由于该项目部署于 Vercel,其默认网址 lastfm-recently-played.vercel.app 在中国大陆无法访问,因此我选择自己重新部署,并绑定到我的域名 lastfm.lkwplus.com 上,以避免被墙。
需要注意的是,官方的部署教程见 GitHub,需要设置两个环境变量,分别是 Last.fm 账户的 API_KEY 及由 Vercel 自动进行分配的 VERCEL_URL。
但是我在部署过程中遇到了无法显示专辑和头像图片的问题,我的解决方式是将项目内的 VERCEL_URL 替换为任意其他名称,如 BASE_URL,从而可以手动将其设置为项目的自定义域名,以规避 Vercel 的自动分配。
const BaseUrl = process.env.VERCEL_URL ? `https://${process.env.VERCEL_URL}` : 'http://localhost:3000';const BaseUrl = process.env.BASE_URL ? `https://${process.env.BASE_URL}` : 'http://localhost:3000';Letterboxd 最近观影记录展示
由于国内的最好用的记录观影记录的平台豆瓣存在各种限制,也并不提供标准可访问的 API,我选择采用相对小众一点的 Letterboxd 平台来记录自己所看的电影。
同样,我借助开源项目 letterboxd-embed-landing-page,将最近的观影记录(包含影评)嵌入到博客中,具体效果可以在博客的 Misc 页面查看。
-
在项目提供的 前端 中输入自己的 Letterboxd 用户名,点击
Generate按钮,生成嵌入代码,如下图所示: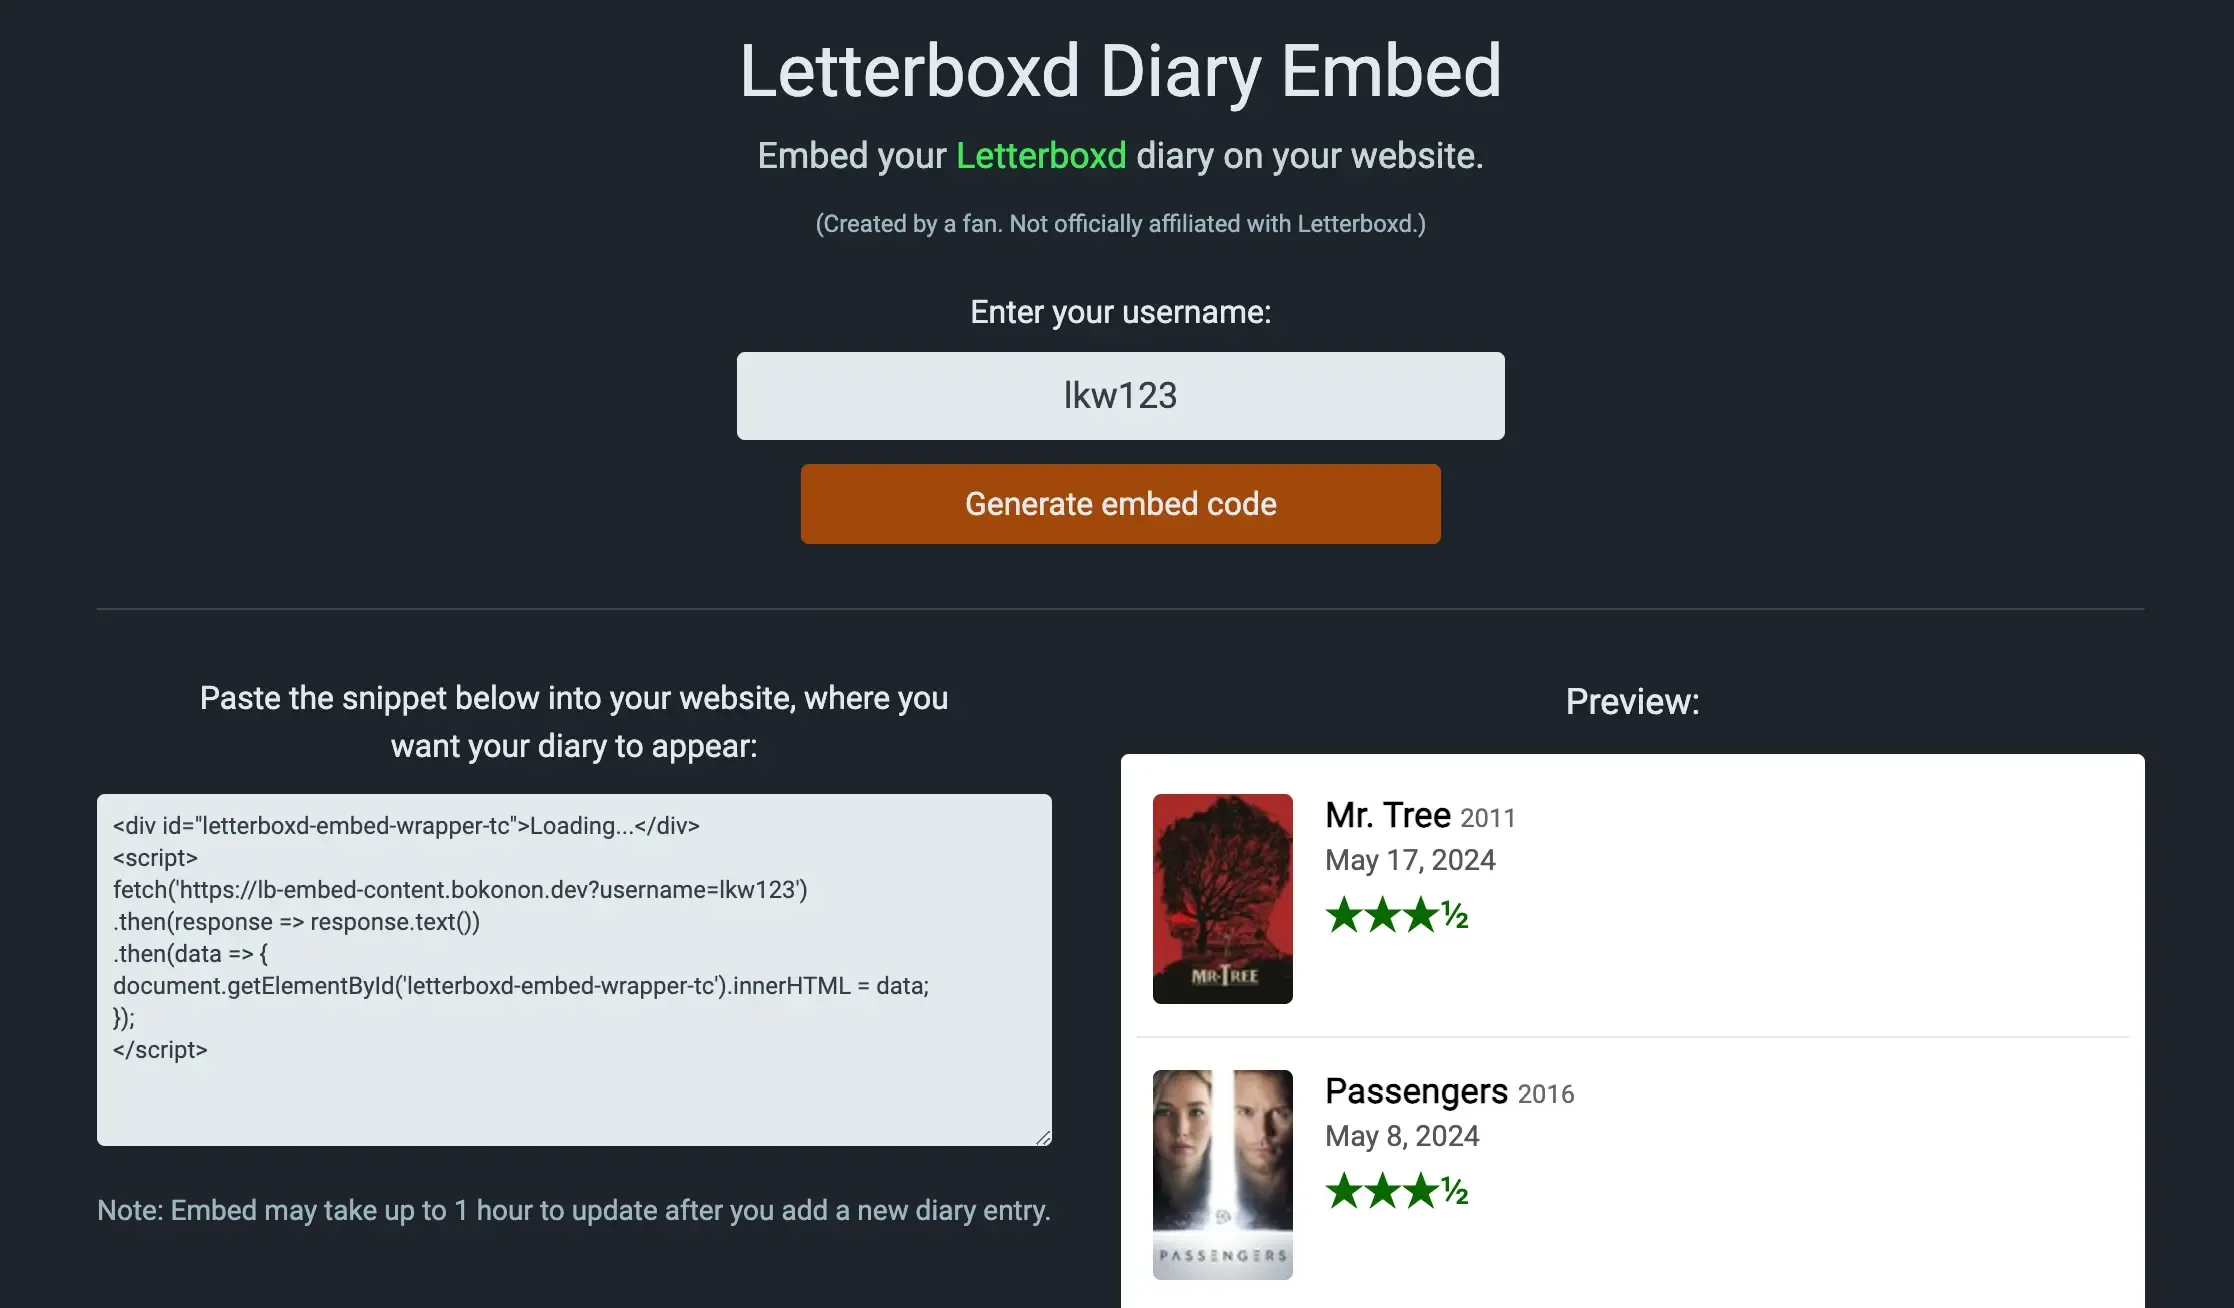
-
个人通过 Cloudflare Workers 自部署了 timciep/letterboxd-diary-embed,也就是该项目的后端,用于处理相关请求,并简单的修改了一些自定义样式,可以通过 https://letterboxd-embed.lkwplus.com?username=|username| 的形式访问。
-
将网站中生成的 snippet 添加到需要放置的页面的
Layout.astro中,以 Misc 为例,其中有两点需要注意:-
将
letterboxd-embed-wrapper-tc放在 id 为misc的section中,以继承原有的样式; -
为了适配网站的深色模式,添加了一些自定义的 CSS 样式,注入到插入的 document 的 style 部分。
src/layouts/MiscLayout.astro diff --git a/src/layouts/MiscLayout.astro b/src/layouts/MiscLayout.astroindex c2fb104..dc7d48f 100644--- a/src/layouts/MiscLayout.astro+++ b/src/layouts/MiscLayout.astro@@ -21,8 +21,38 @@ const { frontmatter } = Astro.props;<main id="main-content"><section id="misc" class="prose prose-img:border-0 mb-28 max-w-3xl"><h1 class="text-2xl tracking-wider sm:text-3xl">{frontmatter.title}</h1>- <slot />+ <slot /><br />+ <div id="letterboxd-embed-wrapper-tc">Loading...</div></section></main>- <Footer /></Layout>+<script>+ fetch("https://letterboxd-embed.lkwplus.com?username=lkw123")+ .then(response => response.text())+ .then(data => {+ const element = document.getElementById("letterboxd-embed-wrapper-tc");+ if (element) {+ element.innerHTML = data;+ }++ const style = document.createElement("style");+ style.innerHTML = `+ html[data-theme="dark"] .letterboxd-embed-tc-title {+ color: lightgray !important;+ }+ html[data-theme="dark"] .letterboxd-embed-tc-date {+ color: gray !important;+ }+ html[data-theme="dark"] .letterboxd-embed-tc-review {+ color: lightgray !important;+ }+ `;+ if (element) {+ element.appendChild(style);+ }+ });+</script>+<Footer /> -
WakaTime Coding 统计展示
为了展示自己的编程活动统计,我采用了 WakaTime 平台,为常用的 IDE/编辑器(如 VS Code、PyCharm、NeoVim、Vim 等)安装了对应插件,通过其提供的 可嵌入图标 的功能,展示在博客中:
<figure><embed src="https://wakatime.com/share/@lkw123/XXX.svg"></embed></figure>在 Footer 添加 Zeabur 图标
自从我将博客和一些其他网站从 Vercel 迁移至 Zeabur 以来(现在又迁到了 Cloudflare),我一直希望可以在网站的 Footer 中添加一个 Zeabur 的 Logo,以便让让更多的人了解到这个优秀的服务。
在 AstroPaper 主题中,Footer 的内容是通过 src/layouts/Layout.astro 中的 Footer 组件定义的,因此我可以在这里添加展示 Zeabur 的 Logo。
为了使得这个 Logo 同时适配网站的浅色模式和深色模式,我采用了一个非常 Naive 的方式:同时引入 id 为 zeabur-light 的浅色 Logo 和 id 为 zeabur-dark 的深色 Logo,然后通过 CSS 控制其显示与隐藏,虽然不太优雅,但是至少可以正常工作了。
diff --git a/src/components/Footer.astro b/src/components/Footer.astroindex 31f452e..dd8fe14 100644--- a/src/components/Footer.astro+++ b/src/components/Footer.astro@@ -1,6 +1,7 @@ ---+import { SITE } from "@config"; import Hr from "./Hr.astro";@@ -18,7 +19,26 @@ const { noMarginTop = false } = Astro.props; <div class="copyright-wrapper"> <span>© 2021 - {currentYear}</span> <span class="separator"> | </span>+ {+ SITE.lightAndDarkMode && (+ <>+ <a href="https://zeabur.com?referralCode=synthpop123">+ <img+ src="https://zeabur.com/deployed-on-zeabur-light.svg"+ alt="Deployed on Zeabur"+ id="zeabur-light"+ />+ </a>+ <a href="https://zeabur.com?referralCode=synthpop123">+ <img+ src="https://zeabur.com/deployed-on-zeabur-dark.svg"+ alt="Deployed on Zeabur"+ id="zeabur-dark"+ />+ </a>+ </>+ )+ } </div> </div> </footer>相关 CSS 定义如下:
diff --git a/src/styles/base.css b/src/styles/base.cssindex 6efa219..7b4de7a 100644--- a/src/styles/base.css+++ b/src/styles/base.css@@ -130,6 +155,27 @@++ html[data-theme="dark"] #zeabur-light {+ display: none;+ }++ html[data-theme="light"] #zeabur-dark {+ display: none; } }TODO
- 添加评论系统
- 优化博客在中国大陆的访问体验
- 完善 RSS 订阅功能
- 优化字体选择和加载
- 将博客从 npm 迁移到 pnpm
- 通过 Memos 的 RSS 功能,在博客中添加一个页面展示 Memos 瀑布流
- 引入 Umami 或者其他统计工具
- 为友链添加 card 样式
- ……